
Tips For Decanting Food & Other Items In A Pantry
There’s something so satisfying about a perfectly decanted and organised pantry! Rows of categorised products stored in matching decanting containers can make food preparation a fun task rather than a boring chore.
When you decant food in your pantry not only makes it look great, but also ensures maximum use of all pantry storage space! If you can create a decanting system that works for you and your family, it can be life-changing and well worth spending some time on implementing.

What is decanting and what are the benefits?

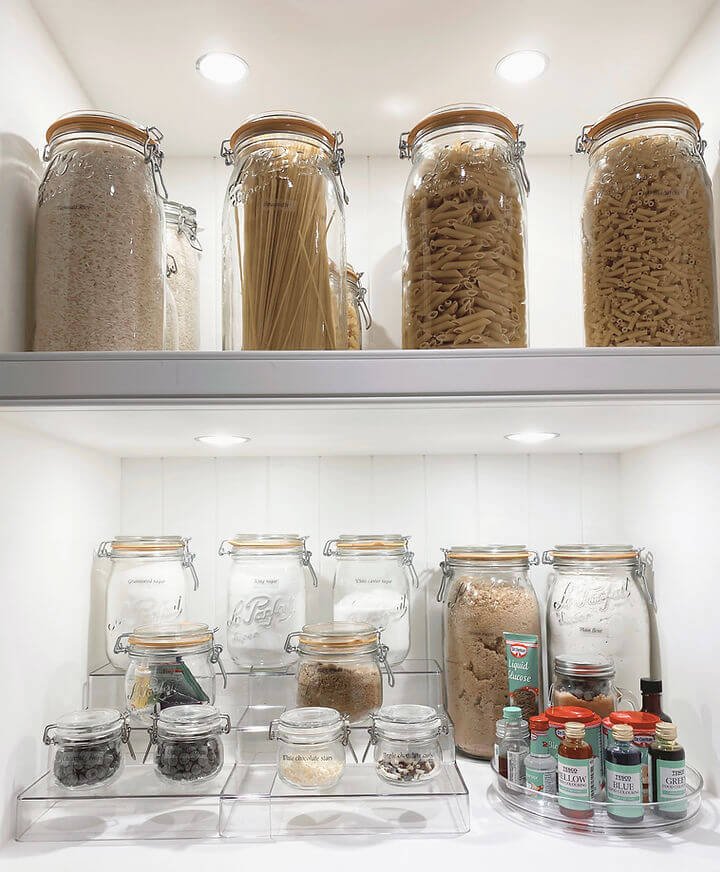
Whilst the term ‘decanting’ may sound intimidating, it simply refers to the process of removing items from their original packaging and transferring them to containers - normally clear glass or plastic ones for easy visibility.
But why go to the bother of all this extra work you may ask? There are a number of benefits to decanting food items in your pantry including the following:
When you decant food, it eliminates much of the physical and visual clutter that accompanies shop bought food and saves space. Food packaging is often bulky and mismatched in shape and size making it difficult to store items in a visually appealing way.
Decanting food helps to save you money. Clear storage containers allow you to see exactly how much of one item you have left before you go food shopping.
Decanting saves time in the long run as it makes it quick and easy for you to find exactly what you’re looking for in your pantry at all times.
Decanting food helps you and your family to stay healthy. By visually being able to see all of the items in your pantry, you are able to make more conscious and healthy choices.
Decanting keeps your food fresher. Airtight seals on the lids of your containers extend the shelf life of your foods so you don’t have to worry about decanted products going stale.
Now that we have shared the benefits of decanting foods in your pantry, we’re going to share our organiser-approved decanting tips to help you get started!

Tip #1: Begin small and be realistic
Decanting can become irritating and unmanageable when you attempt to decant every single item you’re bringing into your home. If you have the space to decant everything and you have plenty of time to replenish these as you shop, then go for it!
But for most people, decanting the most frequently used items or items that are particularly messy when left in their original packaging is the right balance.
Start by decanting a few essential items in your pantry into containers rather than attempting to decant every snack, dried good and baking item all at once. If you only decant a few key items like flour, sugar and a few snacks to begin with, you can see how you feel about the food decanting process.
By not throwing yourself into the process all at once, you can avoid becoming overwhelmed and instead simply test out the system. You want to ensure that the system you’ve set up is easy to maintain and that you’re not spending hours decanting things into 30-40 containers every time you go food shopping.
Slowly but surely you can decant more items in your pantry and you get to understand what works for you and your family.
Tip #2: Buying the correct quantity and size of containers
If you’ve decided that you want to decant dry food, you need to begin by planning out the number of containers you need. This will depend on the size of your pantry and the number of items in it.
Count the number of items you want to decant, remembering that each item will need its own container.
Do you plan to decant all of your dry goods? Just baking items?
Perhaps you only want a set of cute jars for your herbs and spices. Consider the items you use most often and start with these.
Once you have decided upon what will be decanted, you should measure out the size of your pantry cupboard so you know exactly how much room you have to work with. The shape, size and number of containers you buy will all depend on the dimensions of the space you have.
There is no point in buying beautiful-looking jars that are too tall for your shelves or containers for bags of pasta and rice that are too small to fit the entire contents.

Tip #3: Decanting Spices
Spice packaging can come in many different shapes and sizes making them difficult to store in your pantry in a uniformly.
Transferring your spices to uniform jars is a great way to bring order to your collection, however before beginning the task, you should take the time to declutter, discarding any out-of-date spices or duplicates.
When decanting spices, it’s important to use jars that have a) a rubber seal to ensure that freshness is preserved and b) a wide enough opening to fit a teaspoon.
Decanting your spices is an excellent way to keep an eye on stock levels, however just be mindful that if you’re storing your beautifully decanted spices on display, for example in a wall-mounted spice rack, you should be careful to keep this away from direct sunlight which could have a detrimental effect on the quality and freshness of your spices over time.

Tip #4: Labelling decanted items
Labelling your decanted items is necessary in terms of practical use but also a fun way to build the aesthetic of your pantry.
It’s important to include the name of the item within each container so you know what is inside but beyond that it’s down to your personal preference.
A lot of packaging includes expiration dates, instructions and nutritional information that you may want to keep. If so, you can create a label containing this information for the back of the container.
Alternatively, you can cut it off the packaging and tape it to the back of your container or store it inside with the contents.
A label maker is a must-have for creating your decanting labels. We love the brother p-touch label maker, because it’s inexpensive, easy to use, and has a wide range of font options and label styles!

Tip #5: Implementing a system that works
With your pantry items beautifully decanted, it's vital that you implement a system of organisation in the kitchen that works for you and your family. Consider the items that you reach for most often and keep those at eye level so you can access them easily.
Keeping these items in a place where you can always see them will enable easy maintenance over time because the system is aligned with the everyday routine and lifestyle of you and your family.
If your end goal is to save space, try stacking different-sized containers until you’ve found the balance you need. A stackable container set will help to fully utilise the space in your pantry and will help to ensure that things stay neat and organised.
Is decanting food for you?
Whilst we are of course big fans of decanting, it’s important to figure out whether it will suit your lifestyle and way of cooking. If you’re someone whose inventory constantly changes, decanting food may not be sustainable for you over time.
However if you’re looking to prolong the life of your food items whilst elevating your pantry’s aesthetic, decanting could be a great solution for you.
It’s important to remember that the decanting process is entirely customisable to your pantry and lifestyle needs.
It’s completely up to you what you opt to decant and what you choose not to - our tips are just here to help you get started on your organising journey!
If you want to learn more about decanting, be sure to check out our pantry how-to guide which has a whole section dedicated to the subject!

Caroline founded Homefulness in 2019 after a 13-year career at Ernst & Young, where she rose to audit senior manager advising CAC 40 boards in Paris, New York and Singapore. Today she leads a London-based team that has transformed hundreds of UK homes with a fully-managed, white-glove approach to decluttering, organising and move management.
Meet the Homefulness team →